Showing posts with label Star Trip Pinball. Show all posts

Wednesday, February 17, 2016

Sound work on the Star Trip Pinball Table


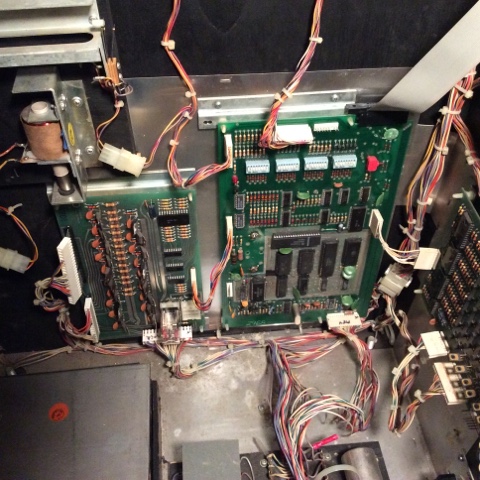
Transistors on the SDU-1 (Solenoid Driver Unit)
I was pretty excited about the information detailed in this post and thought it would fix my Star Trip sound problem.

So I carefully unsoldered all 4 transistors and checked them.

All 4 were good....sigh.

After soldering them back in, I hoped something might have changed so I tried putting the board back in


And turned it on. The sound is still there......

Warning, the following short video has very annoying sound - this is what I am dealing with!


Friday, November 20, 2015

New Information

New information on the quest to fix the sound problems on the Star Trip.

According to this info,
the SSU-1 is driven by transistors on the solenoid board (SDU-1) where the MPU board selects which sounds to play, triggers the appropriate driver transistor on the SDU which in turn selects the sound to be played on the sound board. Sounds are tested during the solenoid test where each of the four sounds should be played once for each respective solenoid transistor. The other SSU boards are driven directly from the MPU board, freeing up solenoid transistors for other game functions. For SSU-1, each of the four sounds is triggered by one of four transistors on the SDU, specifically, Q3, Q10, Q12, Q13. These are connected from J2 on the SDU, to the 8 pin pigtail that hangs off the SSU-1. The pin mappings are as follows:SDU J2 Pin -> SSU-1 pigtail Pin
2 (Q10, Red-Vio wire) -> 2
5 (Q12, Yel-Green wire) -> 5
6 (Q3, Brn-Blu wire) -> 3
7 (Q13, Grn-Blk wire) -> 4

Which means I have been looking at the wrong board, I've been looking at the main processor board when I should be looking at the Solenoid board. This makes sense as I have had to replace several transistors on the SDU already, looks like I may have another bad one!

This is good news and gives me hope for a real fix!

Thursday, November 19, 2015

More work on the Star Trip sound problem

I spent some time tonight looking into the sound problems on the Star Trip table. The issue is that everything works fine for about 3 minutes then a whine begins and never ends. The sound effects try to play but the whine is loud and overwhelms everything.

After reading about some different ideas, I started by reheating all the solder joints on the main board. Not everything, but the ones that looked suspect:


Following that, after reading about problems with "Scanbe" sockets, I pulled the chips off the main board one by one and verified I did not have Scanbe sockets:


After putting it all back together - the same problem. Runs fine, works perfectly but the whine is teeth-rattling after a couple of minutes!

Since the problem occurs only after a few minutes, I reasoned it has to be either a capacitor or some connection that fails as it heats up...note to self, as I write this it occurs to me it could be a chip that fails as it heats up as well.

The next step was to see what board the problem was on: MPU (Main Processor Board) or MSU (Main Sound Unit)

While the game was on, I very carefully opened it up, hoping not to have another self-created disaster. Then unplugged the sound board. My reasoning is that if it is heat-related, unplugging the sound board and letting it cool while the main processor is working will tell me.

My assumption: after 5 minutes, when I plug the sound board back in:

  1. If the sound continues, the problem is in the main board
  2. If the sound is not there but comes back after a couple of minutes, then it was in the cooled down sound board.


After several minutes, I plugged the sound board back in and the whine was still there. It appears the problem is somewhere in the Main Processor Unit...sigh

Next step is to try and decipher the schematics enough to figure out where the sound-related components are and really dig into them.


Tuesday, September 22, 2015

Sound problems with the Star Trip

One of the things I have been struggling with is the sound on the Star Trip pinball.

With the sound board removed everything works correctly. With the sound board connected, I get 6 flashes on the main board, then the sound goes wacky!


According to research:
No seventh LED flash means replace the PIA at U5. Also try disconnecting J1 from the MSU board and rebooting. If the seventh MSU LED flash is seen, the problem is on the MPU board.

Since I only have 6 flashes and when I disconnect the sound board everything looks ok. It seems my best bet is to replace the chip at U5.


Time to go and find one

Tuesday, September 8, 2015

A breakthrough

The Star Trip table has had to wait for a couple of months while I fixed the self-inflicted problem on the Hot Tip table.

But over the 3 day weekend, I decided to re-tackle it. First I tested it to be sure it still had problems, sure enough turning on the solenoid self-test caused the fuse to blow.

Disconnecting the left drop target allowed everything to run. The transistor associated withthe left drop target solenoid is Q4. So I unsoldered the transistor....again......


and tested it.....another dead transistor!


I soldered on a new one, plugged everything back in...


The fuse blew again.


So I did some cussing, then finally settled down and started trying to figure out what was wrong. I finally came up with what I thought was the problem, the diode on the replacement solenoid was pointed the wrong direction.

 There are 3 solenoids, one for each drop target. All use a dual-wire on the left and a single wire on the right:

however, after carefully checking, the diode on the newly replaced solenoid points the opposite direction of the original. Which means either I need to connect the wires on the opposite side or switch the diode to the other direction or the solenoid is going to push in the wrong direction because it is not the right part.

I opted to reverse the wires. Then I unsoldered, tested, verified it was dead, replaced and resoldered the transistor, plugged everything back in...


The fuse blew again.


My wife came out to ask about the cussing. I demonstrated how everything was not working. She suggested checking everything piece by piece and asked about the soldering on the solenoid. I explained how that wasn't the problem and proved it by connecting the multimeter to it...


The multimeter shows that the solenoid is shorted out. So it was time to use my only spare and solder in the new one.


Before I turned it on I finally wished up and decided to replace both the parts at the same time. So the transistor was unsoldered and a new one soldered in. Then I turned it on...


Everything worked!


Friday, July 17, 2015

The saga of the knocker - part 1

One of the interesting pieces of a pinball game is the "knocker." This is the device that makes a loud distinctive sound when you match and get a free game.

On the Star Trip, the knocker solenoid was fried. I found this some time back and had disconnected it (removed the wire) - now it was time to try and fix it.

Step 1 - removal

I pulled it out of the cabinet. It is strange looking compared to the other solenoids:


The dark band around the solenoid shows it is burned. I took everything apart. it has some unique features. There is a long plunger with a copper end on it and the plastic tube sticks out much further than any other ones I have seen.

Checking inside the tube, it looks like there is a wad of gum in there!

After checking with the experts, I found out that:

1) the "knock" sound is the plunger striking the bare side of the metal assembly
2) the "gum" is actually a severely melted plastic tube
3) I will need to replace everything but the metal

Off to order more parts!

Wednesday, June 3, 2015

Cleaning the dropdown - part 2 (disaster)

Time to own up. I have made a totally stupid mistake and have screwed up my table.

I took apart the dropdown and cleaned it. Afterwards the fuse blew.

After considerable head-scratching, I discovered two things:

1) I did not take good enough pictures. It seemed easy to take a couple shots and start taking it apart, but when it came time to put it back together the lack of pictures made it almost impossible to figure out which way the tiny lip was oriented on the sleeve or which wire went where.....I had lots of pictures but the wires were out of focus in every one.

2) after taking my best shot at putting it all back together and wiring it all back up and powering it on, I found I had put the solenoid in upside-down.

Which means it was wired backwards!

Naturally it pops the fuse. I took it apart, put it back together the right way and tried again. Still blows the fuse.

Checking the diode on the solenoid - Its fried....sigh.... so I ordered a replacement.

It finally arrived today and I eagerly soldered it in and turned the table on....it blew the fuse again!

...sigh...

So I disconnected the new parts and the table worked just fine.  I spent considerable time digging around in the parts looking for a short or something, without success. Finally I started checking voltages, I found that the wires to the cleaned dropdown assembly had 28 volts on them all the time instead of being switched.

I am pretty sure that means I have shorted out at least one transistor on one of the boards, possibly a chip.

Oh yaaa

Thursday, May 28, 2015

Cleaning the dropdown - part 1


On the Star Trip pinball table, one of the dropdown targetswill not drop. When the ball hits it, it will usually not drop at all, sometimes it will slowly sink halfway or if I push it it will go down where it is supposed to. The other two work just fine so it was definitely a problem with the one unit.

I thought it might be a bad spring, not strong enough to pull it down and since the others were working this seemed a perfect project as I could compare the good ones with the bad one.

So I set about pulling the mechanism off the table and finding out what was wrong:
At first check, all looked ok. Nothing was obviously broken or bent out of shape.

After unsoldering the connections, I took it apart:


It wasn't until I had it all apart and moved things around that I found what I think was the problem. The spring seemed ok and was about the same tension as the other springs, but the whole mechanism was incredibly dirty!

This is the plunger that supposedly slides easily through the solenoid coil, it should be a shiny smooth polished rod:


My polishing tumbler is still on order, so I sprayed everything with engine degreaser and wiped it all down, then reassembled it.

It seemed to work smoother and I eagerly put it back on the table, soldered the leads back on and fired up the table....


Only to have the fuse blow out immediately!

I checked the solder connections, everything looks good....but now it doesn't work...sigh


(more to come)

Tuesday, May 19, 2015

Success (at last)

Success at last!

After finally (2 months in!) discovering that there was another fuse - cleverly hidden by the Game Plan designers under the playfield rather than where all the other fuses were:


Only to discover it blows immediately when powered on.

Then spending all night carefully unsoldering each and every coil (and diode) and testing them all good.

Finally turning it back on (with all of the coils still unconnected) and the fuse blowing AGAIN!

I posted my results and Viperrwk calmly pointed out that there was one more coil.

Down in the cabinet, underneath the ball that rolls back and forth to prevent tipping the cabinet, there is a coil that fires when the match happens - that big "knock on wood" sound you hear when you are lucky enough to get a free play.

I located the coil and unsoldered it. It does not test as good as the others (2.8 ohm instead of 5.5 or 8)

With ALL the coils now disconnected, I put a new fuse in....crossed my fingers...and turned it on.

The fuse did NOT blow!

woohoo, real progress at last.

Of course it could be that it isn't blowing because there was now nothing at all on the circuit. So I connected three coils, crossed my fingers and tried again.

the fuse did not blow!

and, the coils worked. In diagnostic mode they fire one after another and each one I had reconnected worked just fine.

It appears I have real success. I may be able to put it back together and start playing it!

Sunday, May 17, 2015

Tiny progress

A quick post to report a tiny amount of progress. I finally discovered that mounted to the underside of the playing table on the star trip pinball is another fuse!

And there was no fuse in the holder. Putting a fuse in, it blew immediately but this is a much different problem then thinking I had a logic problem on the driver board. So a tiny amount of progress!

Thursday, May 14, 2015

Star Trip Main Processing Board testing (pics)

While I wait for answers about my questions on the AC leakage from the power supply capacitor. I thought I would turn my attention to the main processing board. I just got a new testing tool, an Atlas DCA55 which says it is easy to use. Just connect it and it figures everything out.

I tried checking the diodes but it is unable to test them while in the board. I'm not ready to unsolder every component and check it yet, so I turned my attention to the transistors.
I checked the first one, and it shows "transistor" and that all is good!


The second one says it is not a transistor but is in fact a diode network...hmmm


with the third one we are back to a transistor again and it is ok.


It thinks the last one is a LED or diode...bizarre

According to the schematic and parts list the bottom 3 are supposed to be the same transistor and the top one is a slightly different transistor. So I guess I will have to unsolder #2 and #4 from the board and check them isolated, it is possible the board connections are messing up the reading.

edit: the manual specifically says it cannot check transistors while in circuit....before i start pulling things off the board at random i think i will look around some more.


While checking the transistors, I noticed the board has a lot of corrosion:
Apparently this is pretty common as the battery they used to store the high scores leaked acid vapors over the years.

After looking around some more it is apparent this board has already been repaired once:
the battery has been removed and the area around it looks to have been sanded down (presumably to remove the corrosion) and even a wire was soldered in where a board trace had failed. So hopefully all of those fixes are still good!


Power supply woes continue

after reading some more about the Star Trip power supply, one of the suggestions was to check the large 11,000 mfd capacitor for AC leakage. According to the article there shouldn't be more than 0.2 volts AC.

After connecting up the multimeter, mine reads 30 volts!
 

So either I am doing it completely wrong (very possible!) or that capacitor is completely destroyed (very possible!)

Off to post more questions...at least I am learning about electronics

Monday, May 4, 2015

Testing the power supply

After purchasing new probe tips for my multimeter I tested the power supply at the connector to the solenoid driver.

I am getting power where it is supposed to be but the voltages are not right:

when I check pins 4 and 1,2 ... I get 12v which matches the circuit diagram
pins 4 and 12 give 33vac instead of 24
pins 4 and 13 give 27v instead of 24
pins 4 and 15 give 5v. Matching circuit diagram

So its off to the forums to ask if this is the problem or no big deal and it is within tolerances

Friday, May 1, 2015

Power Supply Voltages

After tearing out the power supply (P/S) and discovering that it was mounted on a piece of plywood I did some more asking around.

It turns out that the very first generation of these cocktail machines used a handmade P/S, so there isn't anything inherently wrong with my unit.

I was able to get a circuit diagram and parts layout that showed what the fuse sizes were and the expected voltages across them. So I put the P/S back into the unit and checked power.


4th from the bottom was supposed to be 12V, the meter confirmed it was.


3rd from the bottom was supposed to be 7V, my meter shows 3.5V instead.


 2nd from the bottom was supposed to be 28V. I've got the meter on 25V range and it is showing only 14V.

So I have something actually wrong with the power supply circuitry, not too surprising considering it is almost 40 years old, but it complicates things quite a bit. Perhaps this is the only problem with the table though and once this is fixed everything else will work!

Wednesday, April 29, 2015

Power supply problems


I've been really pulling my hair out over the "Star Trip" cocktail table power problems. I think there is a power problem of some kind because none of the solenoids will fire. So either the whole board is shot or there is a power problem of some kind. Checking the power seems an easy first step.
 
But the cocktail tables are a major pain to work on because they are so deep. To reach the power supply board down on the ground level I have to bend over the lip and way down in, trying not to touch anything or bump the brace I have holding the table up.
 
I purchased a repair manual from ebay and it has lots of helpful information on what voltages should be seen on what test points on the power supply board. Unfortunately it did not provide an actual diagram of the board and I can't find them.
 
Finally I found some information on another repair site. And I think I have discovered why I am having such a problem. This is a picture of a standard Star Trip power supply board.


And now, my board:
 
 
Notice any difference? Yes....my power supply "board" is an actual board. Someone removed the board (with its test points) and mounted the power supply components onto a piece of plywood.
 
 
sigh

Thursday, April 16, 2015

The list of problems

After spending some time with the unit last night, my summary is:

Outer Shell

The shell is in pretty good shape considering it is around 40 years old.
 
 
The glass has a lot of scratches on it, the frame around the glass is worn down so the bare metal is visible. The sides are not wood but appear to be a Formica-like wood-simulation laid down over plywood. On the bottom the base is the same, a Formica-like hard coat over plywood. There are chips in the corners but all in all, not too bad.

Playfield

The playfield looks pretty good for the age.
 
When you look close though, it is apparent that the paint is barely hanging on. Look at the "7000" yellow ellipse. You can see the clean area where a mylar plastic film was laid down years ago, and what the unprotected surface looks like.
 
 
I don't see myself removing all the paint and completely redoing the table surface, but a good cleaning and touchup will definitely be needed.

Power/Electronics

There are some problems here.

The person I purchased it from said it played well but got really smoking hot underneath and blew fuses.
In my tests, I am getting inconsistent results. The Power-On-Self-Test runs correctly so the power supply is generating the proper voltage and the main logic board is happy.

However, in 10 power-on tests. My results were:
Logic board: powered on all 10 times, worked good.
Sound board: powered on all 10 times, worked good.
Playfield lights: powered on all 10 times, worked good.
Score display: powered on 2 times. Passed test when it did come on.
Playfield solenoids: never powered on at all.

Based on the report from the previous owner that it played well and that the solenoids don't work at all and the score only displays sometimes, I am currently suspecting a power problem.

Time to get out the multi-meter!

Wednesday, April 15, 2015

Pics of star trip

This is what it looks like now. Not too bad

I have a table!

Thanks to the immense kindness of JosiahCox I am now the proud owner of a Star Trip cocktail pinball!

It has some work needed: some kind of power problem - it blows fuses and heats up far too hot, but I found some repair manuals and schematics. Since I can find the hot end of a soldering iron (at least by the second try) I have every confidence I can get this thing up and running!

Pics coming soon