Wednesday, April 26, 2017

Globetrotters wooden box restoration - phase 1

Now that my computer table is finished (at least phase 1 of it) it is time to turn my attention to getting the Harlem Globetrotters pinball table working again.

As you have read from previous posts here and here, I have started with the back box. The actual wood box is in fairly poor shape, with damaged edges. But at least it is repairable without too much work - some glue and clamping and I should be back in business.

The paintwork is a different story. It is quite bad, faded out and should be redone. 
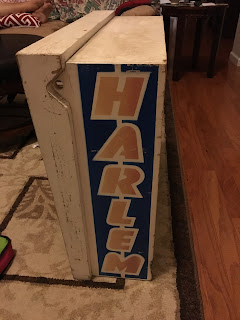
The old case


Some people like the original paint and want to preserve it at all costs, I prefer a more usability approach. I am taking it down to bare wood and repainting and redoing the graphics. When I am done it should look like new!

Taking it down to bare wood should be easy - sand or heat-gun the old paint off and get on with life. However, since the table is from the late 1970's it is still possible it uses lead-based paint and that means I have to be extra-careful!

So I purchased a lead-paint rated air-filter and a large box to house the case in while I sanded the paint off.

I started with the inside as there are a lot of little angles and corners and I knew it would be more difficult. I was sure right about it! there are so many little edges and tabs and little pieces it is almost impossible to get it all. 

Here is a good image showing what it looks like after a few hours of work. Note all the little edges and crevices!
results from the first day of sanding

After doing about all I can with the power sander, its time to move to sandpaper. Its tricky as to keep lead-based dust down I am running the shop vac inside the sanding box at the same time as sanding... a lot of work!


Tuesday, April 18, 2017

THoughts on a lamp switch

I've finished the basic design for the Steampunk-inspired floor lamp. But although the individual lamps have switches in their bases, I wanted a central switch that would turn on/off the light inside the box as well as the lamps.

It ought to be something appropriate for the design of the lamp.

I was thinking of something like a portion of the box rotating to turn the light on/off or something like that.
Looking around the web for inspiration I found a pretty cool "vintage industrial light switch" on eBay but it was over $100 - no way!

still, perhaps I can take a regular lamp switch and make it look appropriate, worst case I can do some kind of pull-chain with a real chain or something.

Thursday, April 13, 2017

Backboard is complete!

After going through 2 soldering guns and 1 soldering iron I have finished soldering a new ground wire on the backboard for the Harlem Globetrotters Pinball.


It is not as beautiful as I had hoped to make it, but it was quite the learning process.

Next up is cleaning the wiring harness for the head unit. Time to head for the sink in the garage.


Soldering Iron woes

My old 65 watt soldering iron that I had in high school seems to have given up the ghost. It was getting hot only intermittently.

So I purchased a nice big beefy 140 watt soldering gun to finish up my soldering with. With almost double the wattage it should heat up and melt the solder twice as quick!

About 3/4 of the way through soldering the backboard the gun died. Cheap modern crap! So this time I purchased both a new gun and a little soldering iron.

After about 1/.2 hour of soldering, my new gun died.....dammit!

I was looking at the label, examining the manufactures info when I noticed a tiny statement:

It might be hard to read, it says "Duty Cycle: 1 min on, 4 min off"

So basically it is supposed to only be turned on for 1 minute at a time and then must cool down for 4 minutes before it can be used again!

I'm not sure what kind of soldering procedure that would work with, but it sure doesn't fit mine. Fortunately I also purchased a soldering iron. Slow but steady for me from now on.

Wednesday, April 5, 2017

Brazil Artwork Repair

The problems with attempting to redo the artwork can be tricky. Here is a tiny example:


This is the only reference image I have to work from. Note the small white box in the center - presumably an ice chest.

On my backglass, this is what it looks like:

My problem is twofold. The shadow and the lines. Projecting the lines gives me a incorrect perspective:


The leftmost lid line is not the same angle as the bottom right box line, everything looks wrong. So how much do I faithfully follow what is there, and how much is the result of a paint chip sliding around or missing pieces.

The shadow is another issue, the notch at the bottom left looks like it is supposed to be there, but I am not so sure about the one at the bottom right.

With a little fudging and nudging I was able to recreate what I think is about what it looked like:


I tried to duplicate the original artist's imperfect style, with wobbly lines and all.

Now on to the next object in the restore......

Monday, April 3, 2017

Designing a Steampunk Inspired Lamp

After finishing my lighted computer desk, I've been looking at my Pinball work area with a fresh eye. I think the area needs some Steampunk styling. I don't need a full total makeover, but I want to add something functional but also with a bit of a WOW factor to my area.

Eventually I want to do some fun things with my light switch, but for now, my biggest need is a lamp. I currently have a couple of old discarded bedside table lamps (with shade) trying to light my work area. What I need is a couple of bright lights that I can move around and point in the right direction.

My first thought was to purchase a couple of these cheap clamp-on lights:


I think that is the right answer for me, but I still need something to clamp them on to. And that's where my steampunk thoughts began spinning. I didn't really want a full, metal-only light like this:

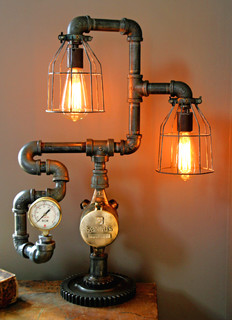
Steampunk Gear Steam Gauge Lamp

Which, although it is wicked-cool, isn't going to fit my needs. So I started designing my own one.

I have a few requirements:
  1. it must be free-standing, and able to stand up on carpet and be stable.
  2. it must be pretty tall. I want the lamps to be able to shine down onto whatever I am working on 
  3. It must be able to support the clamp-on lamps so I can easily point, move and add more or whatever I want.

My concept is this:


The center is two wooden boxes, hollow inside and each about 2-3 feet tall. Then there are pipes, forming feet and links between the two sections of wooden box. At the top is a pipe "square" that the actual lamps can clamp onto. Wiring will run through the center of the pipes and inside the boxes down to the floor and out to the wall.

Construction should be pretty easy, the pipes on the bottom can be wide to provide good stability and the wood boxes allow it to be 5 feet high without being too heavy or expensive. I'm currently thinking of some nice stained and sealed cedar planking for the box - cedar is cheap and long lasting.

Ideally I could put a multi-outlet strip inside the top box so I can literally plug and unplug lamp as needed. I a, not sure I want a box that big though. If not I will just mount a couple on the top and run their wires down and out the bottom.

Time to head to the store and get some materials. Stay tuned!

Backglass Art Restoration

Just a quick post to show I am still working on the United Brazil Bingo Pinball backglass artwork restoration. In addition to my other post on artwork restoration here are a couple of new "before" shots:


You would think this section should be fairly easy to restore. The breaks and tears are in solid-color areas. Of course the reality is that I have to redraw the entire area in Photoshop anyway, but it is relatively easy as the level of detail is low.


This one is going to be tougher. For two reasons. One is that there is a large amount of missing detail. As I mentioned before, this backglass simply does not have any high-resolution scans I can use for reference. And two this is a relatively complex area. It is doable, it will just take some time, especially with my limited skills.