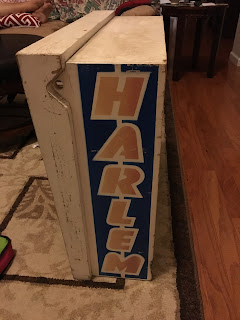
As you have read from previous posts here and here, I have started with the back box. The actual wood box is in fairly poor shape, with damaged edges. But at least it is repairable without too much work - some glue and clamping and I should be back in business.
The paintwork is a different story. It is quite bad, faded out and should be redone.
 |
| The old case |
Some people like the original paint and want to preserve it at all costs, I prefer a more usability approach. I am taking it down to bare wood and repainting and redoing the graphics. When I am done it should look like new!
Taking it down to bare wood should be easy - sand or heat-gun the old paint off and get on with life. However, since the table is from the late 1970's it is still possible it uses lead-based paint and that means I have to be extra-careful!
So I purchased a lead-paint rated air-filter and a large box to house the case in while I sanded the paint off.
I started with the inside as there are a lot of little angles and corners and I knew it would be more difficult. I was sure right about it! there are so many little edges and tabs and little pieces it is almost impossible to get it all.
Here is a good image showing what it looks like after a few hours of work. Note all the little edges and crevices!
 |
| results from the first day of sanding |
After doing about all I can with the power sander, its time to move to sandpaper. Its tricky as to keep lead-based dust down I am running the shop vac inside the sanding box at the same time as sanding... a lot of work!
No comments:
Post a Comment