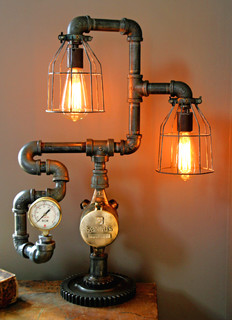
With the shade holders put into place, the steampunk-inspired lamp was finished!
A couple of pictures of it in all its glory:
if you are interested in following the story of this lamp, check out the full thread here.
A blog showcasing my work repairing pinball tables and building fun projects.
Showing posts with label Steampunk. Show all posts
Monday, July 31, 2017
Steampunk Inspired Lamp - shade holders
Since finishing the topper on the steampunk-inspired lamp. I am down to a single issue: holding the lampshades on.
It originally looked like this:
I originally thought about just pulling in the cord but I was worried about longterm "floppyness" so I tried using epoxy to glue the shade to the end of the pipe.
That worked but when I accidentally bumped it, it broke loose.
I do not have a welder and I think the bulb-socket housing is plastic anyway. So I wanted to create something in keeping with the steampunk spirit.
My solution was to spend $1 and get a piece of sheet tin. I then cut it
into short strips. Then popping them into the vice, I bent them into rough "S" shapes:
Using some screw-on pipe squeezers (there is probably a accurate technical term but I don't know it) I connected 3 of my strips to the pipe:
Another 2 on the larger end where the lampshade actually is, then some "hammered metal" paint and misted with black to get it down to the proper look and it is locked on and solid!
The lamp is complete!
It originally looked like this:
| Lampshade holder issues |
I originally thought about just pulling in the cord but I was worried about longterm "floppyness" so I tried using epoxy to glue the shade to the end of the pipe.
That worked but when I accidentally bumped it, it broke loose.
I do not have a welder and I think the bulb-socket housing is plastic anyway. So I wanted to create something in keeping with the steampunk spirit.
My solution was to spend $1 and get a piece of sheet tin. I then cut it
| Cutting the tin |
into short strips. Then popping them into the vice, I bent them into rough "S" shapes:
| Bent tin holder |
Using some screw-on pipe squeezers (there is probably a accurate technical term but I don't know it) I connected 3 of my strips to the pipe:
| locking down the pipe strips |
Another 2 on the larger end where the lampshade actually is, then some "hammered metal" paint and misted with black to get it down to the proper look and it is locked on and solid!
The lamp is complete!
Friday, June 30, 2017
Steampunk-inspired lamp - topper
Despite problems with the switch, the steampunk-inspired lamp construction is going well.
The rest of the parts have come in and I am able to see if my idea bears fruit. If you recall, the original idea included a pipe-cross at the top and some kind of support for the lamp-shades themselves although the details were a bit sketchy.
With the pipes in, I was able to put the pieces together and test-fit the topper
Once it was apparent it was going to fit as indicated. The problem of running the wires through the pipes raised its ugly head. It took some real work to get the electrical wires threaded through the pipes:
Then it was a matter of holding the pipes together with one hand, fitting them into place with the other hand, holding the screw with the other hand, screwing in the screws with the other hand, guiding the wire through the hole in the support wood with the other hand..lol, thats a lot o fhands but eventually I got it done.
Now its just a matter of getting the lamp shades on the the pipes, getting the switch to work and wiring it all up!
The rest of the parts have come in and I am able to see if my idea bears fruit. If you recall, the original idea included a pipe-cross at the top and some kind of support for the lamp-shades themselves although the details were a bit sketchy.
With the pipes in, I was able to put the pieces together and test-fit the topper
| Test fitting the upper mechanism |
Once it was apparent it was going to fit as indicated. The problem of running the wires through the pipes raised its ugly head. It took some real work to get the electrical wires threaded through the pipes:
| threading the wires |
Then it was a matter of holding the pipes together with one hand, fitting them into place with the other hand, holding the screw with the other hand, screwing in the screws with the other hand, guiding the wire through the hole in the support wood with the other hand..lol, thats a lot o fhands but eventually I got it done.
| Topper is in place |
Now its just a matter of getting the lamp shades on the the pipes, getting the switch to work and wiring it all up!
Tuesday, June 27, 2017
Steampunk-inspired lamp, switch problems
One of the fun pieces of designing the steampunk-inspired lamp was the light switch. There are some cool light switches out there (link, link) but they tend to be wall switches and not lamp switches. While researching, I came across the idea of using a water valve as the light switch. Something that fits nicely with the "pipe" theme I have going on and is unexpected for a light switch.
With that in mind, I purchased a set of short pipes, switch and a valve.
The first step is to take the valve apart. The instructions warn, "It will likely be extremely tight, so you probably won't be able to simply hold the valve body in one hand and turn the wrench with the other."
With that in mind, I purchased a set of short pipes, switch and a valve.
The first step is to take the valve apart. The instructions warn, "It will likely be extremely tight, so you probably won't be able to simply hold the valve body in one hand and turn the wrench with the other."
I confidently put the valve in my vise, pulled out a pair of pliers and tried to turn it. All I got for my trouble was a mess.
I got out the vice-grips, tightened them down and tried them. They literally tore the valve body metal edges off, but it would not budge.
I was worried that I had purchased a valve with the stem welded together or something. I eventually tightened down the vice-grips to the point where they dug into the metal and used my sledge hammer to hammer on the vice-grips and finally it gave way.
I ended up with a useless piece of metal:
When the next valve arrived in the mail, I started with the vice-grips and sledge technique and got it off with minimal distortion.
Next came the switch, while it would fit inside it wouldn't stay centered.
The source page was no help, just vaguely referring to some glue and epoxy to hold it together.
I eventually poured quick-set epoxy into the base of the unit while I held the switch in place on top. It worked and the switch was centered below the opening and able to spin.
Next up was drilling out the hole so that instead of moving the valve up and down, it spins easily.
Fortunately this was pretty straightforward and went smoothly.
Then came the all-important "putting it all together"
Sadly, the shaft stuck down so far the threads would not engage. Looking at the shaft, I had hoped to glue the head to the switch, but I had to either grind away the threads on it or shorten the length. I opted to cut off the end:
That gave me the right amount of clearance. The valve-stem holder had enough clearance to screw on, the valve-stem spun freely and and sat nicely on top of the switch.
All I had to do was glue the valve-step to the top of the switch so when I turned it, it would also turn the switch.
I dropped some epoxy on the switch, closed it all up tight, waited my 5 minutes and.....
The valve handle spun freely. Opening it up, the epoxy didn't stick to the switch plastic.
I scuffed up the top of the switch to give the epoxy something to bite onto and tried again.
same problem, the epoxy pops off the plastic switch housing...seriously, who makes switches out of epoxy-proof plastic!
I'm going to try some super-glue and see if that will work... I am so close!!
Wednesday, May 31, 2017
Steampunk Inspired Lamp -Legs Are On
Last posting, I documented the lamp legs.
Now that the various parts have come in and the wood has been stained and clear-coated, it is time to put it all together!
The first step was to create a small triangular brace inside the box. Since the wood is just nailed together on the edges without any central support, I was worried it might collapse if pressure was applied.
So I cut out some triangles, sized them down so they wouldn't full the inside and glued them to the box-halves.
That gave me some good bracing, but when I put the box-halves together, although the braces fit together:
it didn't leave any room for the proposed light inside. I could place the light on one side of the brace but not much light would make it to the other side. It was too late to take the braces out and put in smaller ones, so....
I cut a notch out of them:
Now when the box-halves are put together I have ample room for a light:
After attaching the light to the brace, via the old-school system of hot-glue:
I was able to complete the boxes.
Then it was a matter of measuring and screwing in the legs and the bottom half is done!
LOL, It looks like it ought to be walking around on those legs.
The next step is to connect to the two wooden boxes with the connector pipes and feed the wires through the pipes. Plus do the power switch.. and I have a cool idea for it.
Now that the various parts have come in and the wood has been stained and clear-coated, it is time to put it all together!
The first step was to create a small triangular brace inside the box. Since the wood is just nailed together on the edges without any central support, I was worried it might collapse if pressure was applied.
So I cut out some triangles, sized them down so they wouldn't full the inside and glued them to the box-halves.
That gave me some good bracing, but when I put the box-halves together, although the braces fit together:
it didn't leave any room for the proposed light inside. I could place the light on one side of the brace but not much light would make it to the other side. It was too late to take the braces out and put in smaller ones, so....
I cut a notch out of them:
Now when the box-halves are put together I have ample room for a light:
After attaching the light to the brace, via the old-school system of hot-glue:
I was able to complete the boxes.
Then it was a matter of measuring and screwing in the legs and the bottom half is done!
LOL, It looks like it ought to be walking around on those legs.
The next step is to connect to the two wooden boxes with the connector pipes and feed the wires through the pipes. Plus do the power switch.. and I have a cool idea for it.
Tuesday, May 23, 2017
Steampunk inspire lamp - pipes
Woohoo, With the design complete and the wood in fabrication, the timing was perfect for the pipe order and they have begun to arrive for the Steampunk-inspired lamp!
I don't have the box ready yet but I've set up a sample leg just to see how it will look:
Big and beefy, I like it! those are 6" straight pieces and 3/4" pipe of "black iron" - it has a good look that I think will work well against the wood box.
I like the large length of the pieces for the base, it will make the lamp more stable but it may be too big for the upper connectors. I might go with 3" or 4" offsets rather than 6." We will have to see.
I don't have the box ready yet but I've set up a sample leg just to see how it will look:
Big and beefy, I like it! those are 6" straight pieces and 3/4" pipe of "black iron" - it has a good look that I think will work well against the wood box.
I like the large length of the pieces for the base, it will make the lamp more stable but it may be too big for the upper connectors. I might go with 3" or 4" offsets rather than 6." We will have to see.
Steampunk Inspired Lamp - starting construction
Initial work has begun on the steampunk-inspired lamp.
I chose to use cedar fence-boards for the "box" primarily because I had a couple pieces laying around and they seemed like they would work well.
First, the wooden sides of the upper and lower box were sanded smooth:
Then cut to size and have received their first coat of stain:
Tonight will be the first coat of clear!
I chose to use cedar fence-boards for the "box" primarily because I had a couple pieces laying around and they seemed like they would work well.
First, the wooden sides of the upper and lower box were sanded smooth:
Then cut to size and have received their first coat of stain:
Tonight will be the first coat of clear!
Tuesday, April 18, 2017
THoughts on a lamp switch
I've finished the basic design for the Steampunk-inspired floor lamp. But although the individual lamps have switches in their bases, I wanted a central switch that would turn on/off the light inside the box as well as the lamps.
It ought to be something appropriate for the design of the lamp.
I was thinking of something like a portion of the box rotating to turn the light on/off or something like that.
Looking around the web for inspiration I found a pretty cool "vintage industrial light switch" on eBay but it was over $100 - no way!
still, perhaps I can take a regular lamp switch and make it look appropriate, worst case I can do some kind of pull-chain with a real chain or something.
It ought to be something appropriate for the design of the lamp.
I was thinking of something like a portion of the box rotating to turn the light on/off or something like that.
Looking around the web for inspiration I found a pretty cool "vintage industrial light switch" on eBay but it was over $100 - no way!
still, perhaps I can take a regular lamp switch and make it look appropriate, worst case I can do some kind of pull-chain with a real chain or something.
Monday, April 3, 2017
Designing a Steampunk Inspired Lamp
After finishing my lighted computer desk, I've been looking at my Pinball work area with a fresh eye. I think the area needs some Steampunk styling. I don't need a full total makeover, but I want to add something functional but also with a bit of a WOW factor to my area.
Eventually I want to do some fun things with my light switch, but for now, my biggest need is a lamp. I currently have a couple of old discarded bedside table lamps (with shade) trying to light my work area. What I need is a couple of bright lights that I can move around and point in the right direction.
My first thought was to purchase a couple of these cheap clamp-on lights:
I think that is the right answer for me, but I still need something to clamp them on to. And that's where my steampunk thoughts began spinning. I didn't really want a full, metal-only light like this:
Which, although it is wicked-cool, isn't going to fit my needs. So I started designing my own one.
I have a few requirements:
My concept is this:
The center is two wooden boxes, hollow inside and each about 2-3 feet tall. Then there are pipes, forming feet and links between the two sections of wooden box. At the top is a pipe "square" that the actual lamps can clamp onto. Wiring will run through the center of the pipes and inside the boxes down to the floor and out to the wall.
Construction should be pretty easy, the pipes on the bottom can be wide to provide good stability and the wood boxes allow it to be 5 feet high without being too heavy or expensive. I'm currently thinking of some nice stained and sealed cedar planking for the box - cedar is cheap and long lasting.
Ideally I could put a multi-outlet strip inside the top box so I can literally plug and unplug lamp as needed. I a, not sure I want a box that big though. If not I will just mount a couple on the top and run their wires down and out the bottom.
Time to head to the store and get some materials. Stay tuned!
Eventually I want to do some fun things with my light switch, but for now, my biggest need is a lamp. I currently have a couple of old discarded bedside table lamps (with shade) trying to light my work area. What I need is a couple of bright lights that I can move around and point in the right direction.
My first thought was to purchase a couple of these cheap clamp-on lights:
I think that is the right answer for me, but I still need something to clamp them on to. And that's where my steampunk thoughts began spinning. I didn't really want a full, metal-only light like this:
Which, although it is wicked-cool, isn't going to fit my needs. So I started designing my own one.
I have a few requirements:
- it must be free-standing, and able to stand up on carpet and be stable.
- it must be pretty tall. I want the lamps to be able to shine down onto whatever I am working on
- It must be able to support the clamp-on lamps so I can easily point, move and add more or whatever I want.
My concept is this:
The center is two wooden boxes, hollow inside and each about 2-3 feet tall. Then there are pipes, forming feet and links between the two sections of wooden box. At the top is a pipe "square" that the actual lamps can clamp onto. Wiring will run through the center of the pipes and inside the boxes down to the floor and out to the wall.
Construction should be pretty easy, the pipes on the bottom can be wide to provide good stability and the wood boxes allow it to be 5 feet high without being too heavy or expensive. I'm currently thinking of some nice stained and sealed cedar planking for the box - cedar is cheap and long lasting.
Ideally I could put a multi-outlet strip inside the top box so I can literally plug and unplug lamp as needed. I a, not sure I want a box that big though. If not I will just mount a couple on the top and run their wires down and out the bottom.
Time to head to the store and get some materials. Stay tuned!
Subscribe to:
Posts (Atom)