Friday, June 30, 2017

Steampunk-inspired lamp - topper

Despite problems with the switch, the steampunk-inspired lamp construction is going well. 

The rest of the parts have come in and I am able to see if my idea bears fruit. If you recall, the original idea included a pipe-cross at the top and some kind of support for the lamp-shades themselves although the details were a bit sketchy.

With the pipes in, I was able to put the pieces together and test-fit the topper

Test fitting the upper mechanism

Once it was apparent it was going to fit as indicated. The problem of running the wires through the pipes raised its ugly head. It took some real work to get the electrical wires threaded through the pipes:
threading the wires

Then it was a matter of holding the pipes together with one hand, fitting them into place with the other hand, holding the screw with the other hand, screwing in the screws with the other hand, guiding the wire through the hole in the support wood with the other hand..lol, thats a lot o fhands but eventually I got it done.
Topper is in place

Now its just a matter of getting the lamp shades on the the pipes, getting the switch to work and wiring it all up!

Tuesday, June 27, 2017

Steampunk-inspired lamp, switch problems

One of the fun pieces of designing the steampunk-inspired lamp was the light switch. There are some cool light switches out there (link, link) but they tend to be wall switches and not lamp switches. While researching, I came across the idea of using a water valve as the light switch. Something that fits nicely with the "pipe" theme I have going on and is unexpected for a light switch.

With that in mind, I purchased a set of short pipes, switch and a valve.

The first step is to take the valve apart. The instructions warn, "It will likely be extremely tight, so you probably won't be able to simply hold the valve body in one hand and turn the wrench with the other."


I confidently put the valve in my vise, pulled out a pair of pliers and tried to turn it. All I got for my trouble was a mess.

I got out the vice-grips, tightened them down and tried them. They literally tore the valve body metal edges off, but it would not budge.

I was worried that I had purchased a valve with the stem welded together or something. I eventually tightened down the vice-grips to the point where they dug into the metal and used my sledge hammer to hammer on the vice-grips and finally it gave way.

I ended up with a useless piece of metal:


When the next valve arrived in the mail, I started with the vice-grips and sledge technique and got it off with minimal distortion.


Next came the switch, while it would fit inside it wouldn't stay centered.
The source page was no help, just vaguely referring to some glue and epoxy to hold it together.

I eventually poured quick-set epoxy into the base of the unit while I held the switch in place on top. It worked and the switch was centered below the opening and able to spin.

Next up was drilling out the hole so that instead of moving the valve up and down, it spins easily.


Fortunately this was pretty straightforward and went smoothly.


Then came the all-important "putting it all together"

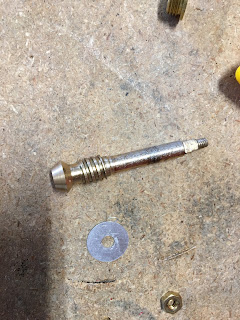
Sadly, the shaft stuck down so far the threads would not engage. Looking at the shaft, I had hoped to glue the head to the switch, but I had to either grind away the threads on it or shorten the length. I opted to cut off the end:


That gave me the right amount of clearance. The valve-stem holder had enough clearance to screw on, the valve-stem spun freely and and sat nicely on top of the switch.

All I had to do was glue the valve-step to the top of the switch so when I turned it, it would also turn the switch.

I dropped some epoxy on the switch, closed it all up tight, waited my 5 minutes and.....


The valve handle spun freely. Opening it up, the epoxy didn't stick to the switch plastic.


I scuffed up the top of the switch to give the epoxy something to bite onto and tried again.


same problem, the epoxy pops off the plastic switch housing...seriously, who makes switches out of epoxy-proof plastic!

I'm going to try some super-glue and see if that will work... I am so close!!

Bingo Pinball not resetting

After some discussion online with the experts on what my next steps should be, I plugged the United Brazil Bingo Pinball machine and and manually set it up a couple of games (by pushing on the lever).


When turned on, it is supposed to rest back to zero. I plugged it in and turned it on:

and it runs! but it never resets back to zero.


After digging around and looking at it, it looked like the solenoid that was pushing the reset level wasn't doing its job....seemed like a straightforward sticky solenoid plunger.


I pulled the unit out of the Bingo:


and pulled off the solenoid.


Surprise! it was in great shape, not mushroomed or sticky at all. In an effort to figure out what is going on, I managed to film myself working the unit manually:


Analyzing the movement, it looks like the little lever connected to the tiny spring is not moving the way it should around that shaft. I'm going to pull off the lever and clean the shaft.


Monday, June 19, 2017

A big thanks

A big shoutout to the previous owner of my United Brazil bingo pinball game.

In order to get the Brazil upstairs and into my workarea, I had to remove the topper. No big deal, those come off all the time. But in the ancient pre-electronics era when this thing was made (circa 1956) they didn't have modern connectors.

So what did they do?


They used an ancient knife-connector style of thing. The problem is that the "knives" fit in multiple connectors.

I searched desperately for some method other than the "try it and see if smoke comes out" method. Fortunately the previous owner was smart enough to put a dot of colored paint on each connector - you can see the yellow dot easily on the top of the leftmost connector.

Then it was simply a matter of checking each "knife" and matching up the colors!

As a side benefit of this work. The lights now have come on, so apparently part of my problem was just corrosion on the connectors!


Thursday, June 15, 2017

Cleaning the Pinball Wiring

With all the postings about my Steampunk-inspired lamp, it is hard not to forget that I am still working on the renovation of my Harlem Globetrotters World Tour pinball.

One of the key pieces is getting the wiring cleaned. It sounds simple to clean a wire but in reality you've got a large bundle of wires in poor, oily, dirty condition and it can be a lot of work to clean them.

After reading of several different techniques, I opted for Vid1900's guide. He basically says to throw it in the dishwasher, it will be fine!


Wiring harness in the dishwasher
So it was with considerable trepidation that I put my precious wiring into the dishwasher, worried about the colors on the wires (what if they all come out white!) worried about the connectors (what if the old plastic softens and the connectors fall out) worried about the moisture (what if water gets under the insulation and rusts the wires)

Per the recommendation, I put it on "High Temp Pots and Pans" rather than "gentle," crossed my fingers and pushed "Start"


90 minutes later I had a perfectly clean wiring harness!
Cleaned wiring

it looks like everything worked perfectly. My blue tape with labels on it even survived. 

I fired up the air compressor and blew out the moisture still trapped in the connectors just in case. But it all looks good!

whew


Tuesday, June 6, 2017

Brazil backglass artwork continues

Work continues on the Brazil backglass artwork.

I have made it to a pretty hammered section so the progress is slow. Part of the interesting work is attempting to duplicate the artists casual style.

For example, this is a section of a scan of my original glass:


What you are seeing is a bit of the pennant on the top of a sailboat mast and the shoreline in the background. Note how the white of the flag at the top does not match the black outline. The "shore" is even worse, with the black lines mostly working as a guideline.

It means that I don't have to be too perfect as the original was not photo-perfect, but I want it to be as faithful to the original as possible.

Below is a side-by-side section of the sailboat. On the right is the original, not much there... on the left (top) is my best guess of what the sailboat looked like originally:


Note how the lines are not perfect. I hope I did a faithful job on it. Below is a GIF showing both compared:


One sailboat down, 2 more to go.....Work continues!