Wednesday, February 15, 2017

a new computer table-top - Construction

Construction of the table top is proceeding. I sized it out at 3 foot by 15 feet and had 2 sheets of plywood cut to size.

The next step has been staining and sealing the wood. This is currently underway:


A problem was the edge. I originally got some stick-on wood tape for the edge, but the 3/8" plywood is too thin-looking and I didn't think it would look good enough.

To remedy it, I purchased some 3/4" block wood in 8 foot lengths. It is being painted glos black and will be the front edge of the table. I think the black will look good and the thickness will make it look more solid.

More to come!

a new computer table-top - Design

With the basic criteria defined for my new table-top:
  1. must be a single piece of wood all the way across both current areas (about 13 feet wide)
  2. must be rock solid (not slide around)
  3. must be level (our desks are currently 1/4 inch off in height)
  4. must have a coolness factor

I searched for the right design.

(1) For the table surface itself, I looked at butcher-block flooring but although a table is a relatively small surface compared to a floor, it was still too much. I opted for oak-sided plywood (2 sheets of 4x8 feet)

(2) for it to be rock solid, it needed to butt against the wall or be locked into the desks. I opted to butt it up against the wall. Rather than size the piece of wood exactly to the wall with the difficulties of that and not messing the wall when install I opted for a about 1 inch of clearance all the way around. Then a smaller piece will be bolted on underneath that will touch the wall and lock it into place.

(3) for leveling, I have opted for stick-on felt disks (like what goes under chair legs to protect the floor) - this will protect the original desks, help to deaden sound, and I can vary the necessary height to easily make it flat.

(4) for the coolness factor, I looked at several nice looking computer desk layouts such as this one, and many of them have 2 things in common.
  1. very clean design, no visible cables
  2. back-lighting around the back side of the table

Based on this I have opted for a table-top that has LED lighting on the backside and custom holes exactly placed for the necessary cables in my layout.


a new computer table-top - Criteria

Working on the United Brazil wooden legs reminded me that other wood-related projects needed some attention.

The first revolves around my computer desk. My wife and I use our computers side by side. Her desk is an old heavy-duty office desk that weighs around 500 pounds, is solid oak and is chewed up pretty badly. Mine is a cheapie IKEA desk, with the surface all bubbled from too many cokes.


My first thought was to build a new custom table for the two of us, but I had 2 issues:
  1. Making a rock-solid custom table or desk with drawers is a LOT of work - and not really needed since the two desks already work great.
  2. We may be moving in a couple of years. Did I really want to put all of that work into something that would be torn out in 2 years?

For me, the answer was to create a new table "top" and lay it over the old ones. This had some advantages:
  1. relatively cheap (a lot less wood)
  2. relatively easy to do (basically just a table top)
  3. can still be "custom" without being built-in (more later)

My design criteria:
  1. must be a single piece of wood all the way across both current areas (about 13 feet wide)
  2. must be rock solid (not slide around)
  3. must be level (our desks are currently 1/4 inch off in height)
  4. must have a coolness factor

Thursday, February 9, 2017

United Brazil backglass artwork

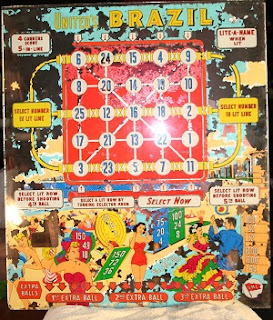
Taking a break from digging around in the electronics of the United Brazil, I decided to tackle the other part of it that is in poor shape - the backglass.

In many cases, when a pinball backglass is old and the paint is flaking off, a new one can be purchased, either a replacement from eBay off another machine or from companies that specialize in creating replacement artworks.

In this case, the Brazil is quite rare and none of that is possible. Looking at the backglass, I decided to attempt to make a new graphic myself, filling in the missing pieces as best as I could.

I started looking for some reference images online, but there are only a couple and all are very low rez (less than 500 pixels wide) so they are pretty useless for this kind of work.

But I wanted to get started, I tried scanning the image on my flatbed scanner. It turns out the thickness of the glass puts it completely out of focus! It would have to be a camera then.

I set up my camera as close to 90 degrees as I could to prevent barrel distortion and took several high-res pics, then stitched them together in Photoshop resulting in a 6000x7000pixel image.

(small version)


Then I started fixing the "easy" stuff, the geometric shapes like circles and squares, the sky, etc.


I am slowly making progress, here is an example:

That area is complete. But down in the complex stuff it is a different story:

on the left is the original scan. On the right is the same area as it looks now, as you can see I have some of it done but the complex shapes like the building and the man walking are still to be done, and in some cases it is gone and I don't know what is supposed to be there. But it will end up being better than it was and I will still have the old one for any purist collectors.

It is a slow process. Things like the letters. In an effort to be authentic, I am scanning each letter individually. In many cases different versions of the same letter exist - a "T" doesn't look exactly the same everywhere, so I am assuming they were hand-drawn. Rather than just use a font I am doing my best to make it as perfect of a reproduction as I can.

Brazil Legs

(dated January 2017)

Leg refinishing the Brazil Pinball was pretty straightforward.

The legs are simple wood. I removed the fittings (bolts that held them to the table, the bottom spacers and the side bolts that prevented the wood from splitting) and threw them all into the tumbler for polishing.

The legs themselves were sanded down smooth to get rid of the old finish, scuff marks, etc.

I then put a couple of coats of stain on them and several coats of clear.

The bolts and parts came out of the tumbler looking like new and it all bolted back together just like it was supposed to.

With the legs on, I was able to remove the sawhorses and let it stand on its own!

Turning on the United Brazil

(dated December 2016)

I turned on the United Brazil pinball. Despite its good looks inside, nothing happened other than 2 lights came on. Still - that the lights came on indicated the power was good for at least part of it.

I checked the fuses - amazed at how little has changed. These are literally the exact same fuses I purchase now at the hardware store in a 60 year old machine. The fuse holders are the same, everything is the same except that since it dates before electronics, everything is individually wired with a wire.

The fuses looked good:


I located the schematic and dug out my multimeter. Initial results looked good, the power coming off the transformer seemed ok.


My problem is that the access panel to the power area is on the side of the unit. I need to get it moved into my workarea so I can easily get access.

In order to do that I need to get it off the sawhorses (I removed the legs for transport)

The wooden legs are in poor shape so rather than simply bolting them back on, I decided to refinish them and get them back to shape first.

United Brazil Bingo Pinball

(dated November 2016)

Today was a red-letter day! I spotted an ad for a "classic pinball machine" at a local shop and went to take a look. It was in surprisingly good shape, not like some:

And the price was good, real good. It looked like it might a restoration project.

On closer view it turned out to be a 1956 "United Brazil" Bingo Pinball machine: Original Brochure

and when we got it home and really got a look at it, other than the backglass, it was in pretty good shape:


Back Online


Well, its been awhile and I let this drift away. Going to start posting again and fill in because some interesting things have been happening.